Dynamic fields [Classic]
You can add Dynamic fields to Notification templates to populate emails and SMS notifications with customized data.
In this article, you’ll learn about Dynamic fields.
<script id="snippet-prepend">$(function(){
/*disable in widget*/ if($('.w-documentation-article').length === 0){
var ToC = "<nav role='navigation' class='table-of-contents toc-top'><h4>In this article:" + "<ul>"; var el, title, link, header; //Define the heading levels you want to use in ascending order. Can add extra or remove unneeded. $(".hg-article-body h1, .hg-article-body h2, .hg-article-body h3, .hg-article-body h4").each(function() { el = $(this); title = el.text(); if(title != ''){ anchorTitle = el.text().replace(/([~!@#$%^&*()_+=`{}\[\]\|\\:;'<>,.\/\? ])+/g, '-').toLowerCase(); link = "#" + anchorTitle; //Set all headers to a 0-nesting level. header = 'header-nesting-0'; //Adjust header-nesting layers so that they point to the correct html tag. header-nesting-1 should match the second .hg-article-body h# listed above; header-nesting-2 should match the third, etc. if($(this).is('h2')){ header = 'header-nesting-1'; }else if($(this).is('h3')){ header = 'header-nesting-2' } el.html('<a id="'+anchorTitle+'" class="toc-anchor">' + el.html()); newLine = "<li class='"+header+"'>" + "<a class='article-anchor' href='" + link + "'>" + title + "" + "";
ToC += newLine; } }); ToC += "" + ""; $("#snippet-prepend").before(ToC); }});
</script><style>/* CSS to style the TOC as it displays and the auto-created anchors.toc-top styles the box for the TOC; adjust styles here to tweak look and feel */
.toc-top { background-color: #FAFAFA; /* set to #fff or delete entirely for no background */ border: 1px solid #C8C8C8; /* adjust the color hex here to change border color */ box-shadow: 0 1px 1px rgba(0, 0, 0, 0.05) inset; margin-top: 24px; margin-bottom: 36px; min-height: 20px; padding: 13px 20px; max-width: 75%;}.toc-top h4 { font-size: 18px; line-height: 26px; margin: 0 0 8px; font-weight: 400;}.toc-top ul { padding: 0 0 0 15px !important; margin-bottom: 0;}.toc-top > ul { margin-bottom: 13px!important;}.toc-anchor { display: block; height: 90px; margin-top: -90px; visibility: hidden;}
/* Set the indentation for the nesting levels. May need to be edited to match changes above. Increase or decrease the margin-left to get your desired level of indentation. */.header-nesting-1 { margin-left: 14px;}.header-nesting-1:before { background-image: url(https://dyzz9obi78pm5.cloudfront.net/app/image/id/5d31bcc88e121c9b25ba22c4/n/bulletv2.svg)!important;}.header-nesting-2 { margin-left: 28px;}.header-nesting-2:before { background-image: url(https://dyzz9obi78pm5.cloudfront.net/app/image/id/5d31be536e121cf22b0cc6ae/n/bulletv3.svg)!important;}</style>How do Dynamic fields work?
Section titled “How do Dynamic fields work?”Dynamic fields allow you to create email and SMS notifications that contain specific information related to your bookings and are personalized for the Customer and User.
For example, let’s say you want to start a confirmation email with a personalized greeting. To do this, you’ll insert the dynamic field called Customer name into the template. Once you do this, every confirmation email will start with “Dear <Customer name>”. OnceHub will insert the name the Customer provided in the Booking form where you defined that the field “Customer name” should be.
Where do Dynamic fields get data from?
Section titled “Where do Dynamic fields get data from?”OnceHub provides over 80 Dynamic fields to choose from. Dynamic fields contain information taken from:
- Booking details.
- Customer information from the Booking form.
- Booking page details.
- Event type details.
- Canceling and rescheduling data.
- Reassignment details.
- Reminders and Follow-up settings.
- Website widget data.
- User details.
- CRM data.
- Custom fields created in the Booking forms editor.
- Payment data.
Note Payment data is specified per transaction rather than per activity. Therefore, one activity may have a number of transactions. For example, a single booking may have a rescheduling fee and a refund.
Adding Dynamic fields to your notification template
Section titled “Adding Dynamic fields to your notification template”- Create a Custom template.
- Place the cursor in the template editor text box where you want to insert the Dynamic field (Figure 1).
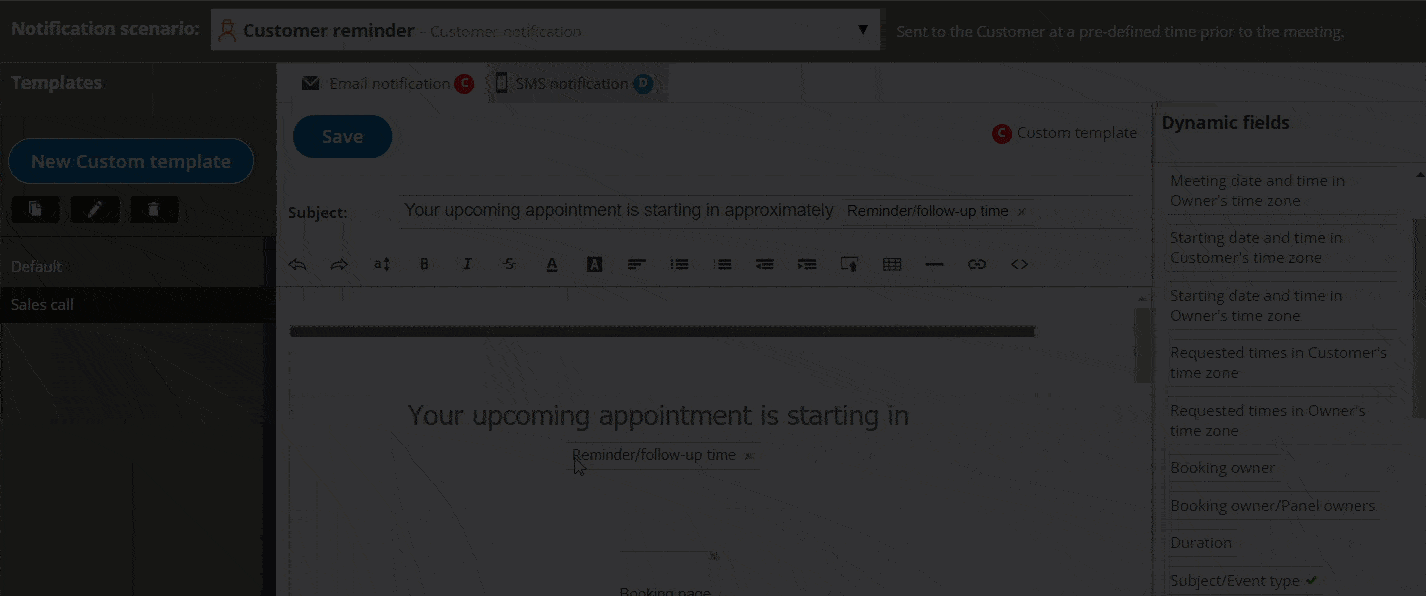 Figure 5: Place the cursor in the template editor text box
 - In the Dynamic Fields column on the right, click the Dynamic field you want to add (Figure 2).
 Figure 2: Add a Dynamic field
 - The chosen Dynamic field will appear in the selected location in the template.
To remove a Dynamic field, click on the X next to the Dynamic field you want to remove.
NoteWhen you use Dynamic fields, you need to be sure that the data exists in your scheduling scenario.
For example, Event type price is one of the Dynamic fields available to you. However, if you do not enter an Event type price in the Payment/cancel and reschedule policy section, no data will be displayed for this field in your emails and SMS notifications.
Dynamic fields and localization
Section titled “Dynamic fields and localization”When Customer notifications based on Custom templates are sent, Dynamic fields such as time zone, country and location are shown in the locale (language) selected on the Booking page. The date/time format also follows the selected locale. In all other cases, Dynamic fields are shown in English, and the date/time format follows User profile settings. Learn more about localization
| Default templates | Custom templates | |
| User notifications by email and SMS | OnceHub Dynamic fields are shown in English. Date/time format follows User profile settings. | OnceHub Dynamic fields are shown in English. Date/time format follows User profile settings. |
| Customer notifications by email and SMS, and the Calendar event | OnceHub Dynamic fields are shown in English. Date/time format follows User profile settings. | OnceHub dynamic fields such as time zone, country, and location are shown in the locale (language) selected on the Booking page. Date/time format follows locale settings. |