Hiding fields on the Booking form [Classic]
When you add a Custom field to your Booking form, the field is visible by default. You can choose to hide the field, so that it will not be displayed on the Booking form.
In this article, you’ll learn about hiding fields on the Booking form.
<script id="snippet-prepend">$(function(){
/*disable in widget*/ if($('.w-documentation-article').length === 0){
var ToC = "<nav role='navigation' class='table-of-contents toc-top'><h4>In this article:" + "<ul>"; var el, title, link, header; //Define the heading levels you want to use in ascending order. Can add extra or remove unneeded. $(".hg-article-body h1, .hg-article-body h2, .hg-article-body h3, .hg-article-body h4").each(function() { el = $(this); title = el.text(); if(title != ''){ anchorTitle = el.text().replace(/([~!@#$%^&*()_+=`{}\[\]\|\\:;'<>,.\/\? ])+/g, '-').toLowerCase(); link = "#" + anchorTitle; //Set all headers to a 0-nesting level. header = 'header-nesting-0'; //Adjust header-nesting layers so that they point to the correct html tag. header-nesting-1 should match the second .hg-article-body h# listed above; header-nesting-2 should match the third, etc. if($(this).is('h2')){ header = 'header-nesting-1'; }else if($(this).is('h3')){ header = 'header-nesting-2' } el.html('<a id="'+anchorTitle+'" class="toc-anchor">' + el.html()); newLine = "<li class='"+header+"'>" + "<a class='article-anchor' href='" + link + "'>" + title + "" + "";
ToC += newLine; } }); ToC += "" + ""; $("#snippet-prepend").before(ToC); }});
</script><style>/* CSS to style the TOC as it displays and the auto-created anchors.toc-top styles the box for the TOC; adjust styles here to tweak look and feel */
.toc-top { background-color: #FAFAFA; /* set to #fff or delete entirely for no background */ border: 1px solid #C8C8C8; /* adjust the color hex here to change border color */ box-shadow: 0 1px 1px rgba(0, 0, 0, 0.05) inset; margin-top: 24px; margin-bottom: 36px; min-height: 20px; padding: 13px 20px; max-width: 75%;}.toc-top h4 { font-size: 18px; line-height: 26px; margin: 0 0 8px; font-weight: 400;}.toc-top ul { padding: 0 0 0 15px !important; margin-bottom: 0;}.toc-top > ul { margin-bottom: 13px!important;}.toc-anchor { display: block; height: 90px; margin-top: -90px; visibility: hidden;}
/* Set the indentation for the nesting levels. May need to be edited to match changes above. Increase or decrease the margin-left to get your desired level of indentation. */.header-nesting-1 { margin-left: 14px;}.header-nesting-1:before { background-image: url(https://dyzz9obi78pm5.cloudfront.net/app/image/id/5d31bcc88e121c9b25ba22c4/n/bulletv2.svg)!important;}.header-nesting-2 { margin-left: 28px;}.header-nesting-2:before { background-image: url(https://dyzz9obi78pm5.cloudfront.net/app/image/id/5d31be536e121cf22b0cc6ae/n/bulletv3.svg)!important;}</style>Why hide fields on the Booking form?
Section titled “Why hide fields on the Booking form?”Hiding fields is typically done to pass internal company information through the booking process, without exposing it to the Customer.
For example, you might have an ID for a particular marketing source that you need to track with the booking information. The ID is internal and Customers should not see it when they book. With hidden fields, you can include the ID in the URL parameters and pass it to a third party CRM integration, add it to a calendar event, or include it in User notifications.
Customers are not able to input a value for hidden fields, and hidden fields cannot be made into mandatory fields. To use a hidden field, you should provide a value with URL parameters.
Hidden fields should not be used to pass sensitive information because the data is still visible and editable in the Booking page URL.
Important Data from hidden fields will be added to the default calendar event in the User’s connected calendar. If the Customer is included as a guest on the calendar event they will see the hidden field data in the event details.
To prevent this you can remove the Customer from the calendar event or you can create a custom event template.
Creating a hidden Custom field
Section titled “Creating a hidden Custom field”-
Go to Booking pages in the bar on the left.
-
On the left, select Booking forms editor.
-
In the Fields library section on the right of the page, click the Add Custom field to library button.
-
Select Single line text field as the Field type (Figure 1).
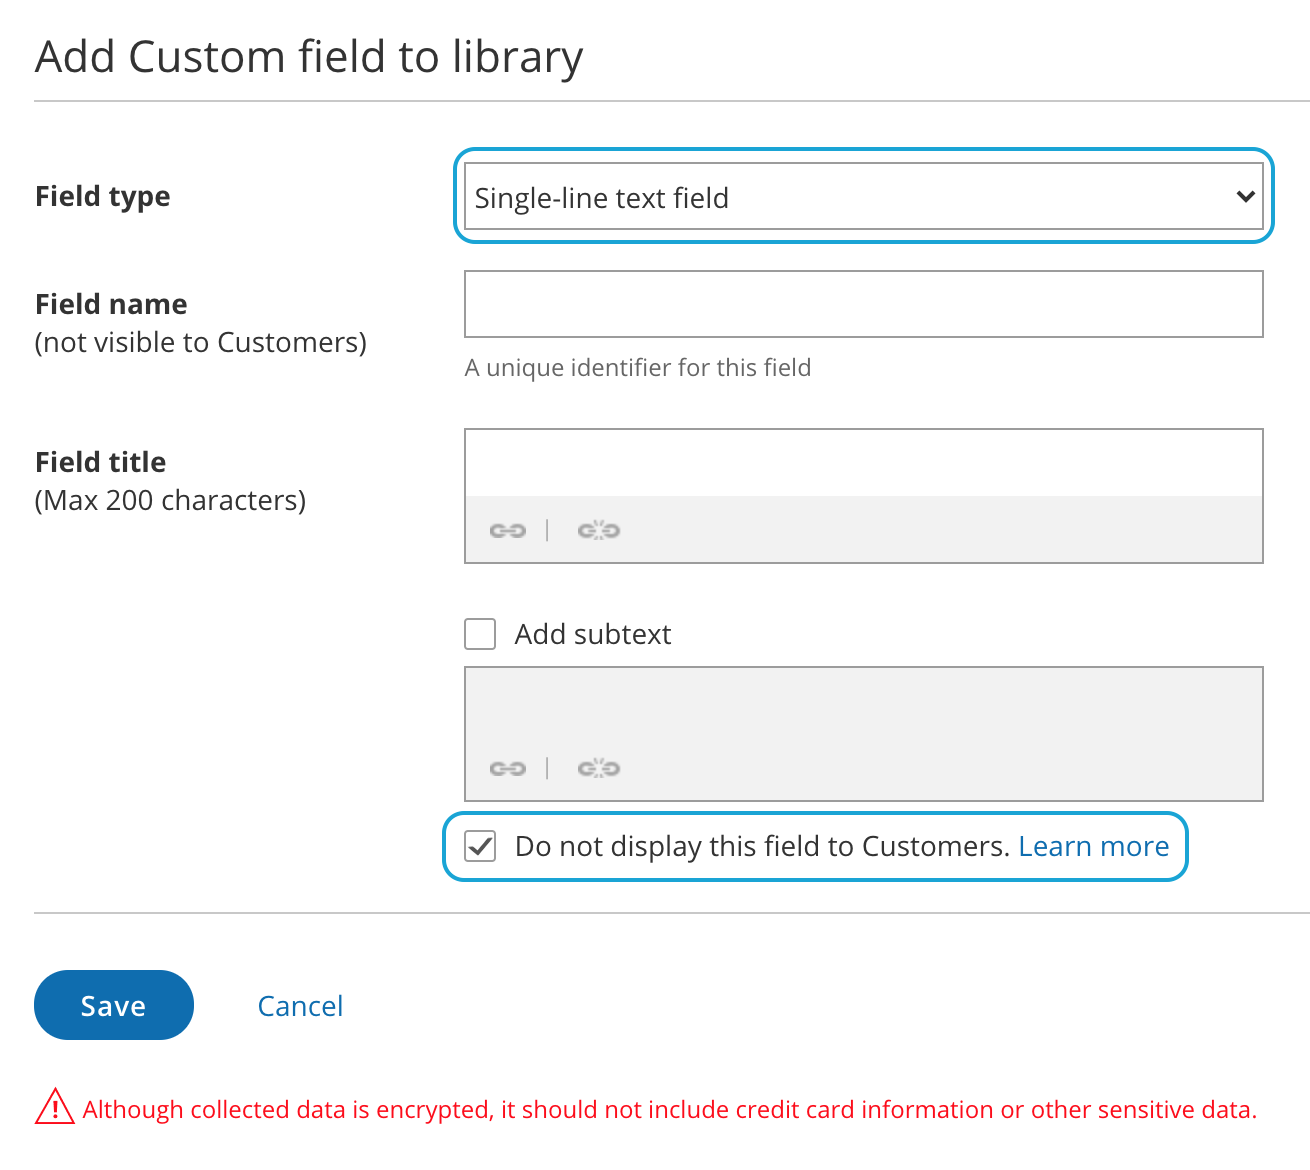
Figure 1: Creating a hidden Custom field
-
At the bottom of the Field editor, check the Do not display this field to Customers box.
-
Click Save.
To use a hidden Custom field, add it to your booking form.
NoteHidden fields do not show in the Booking form previews.
Hidden field example
Section titled “Hidden field example”You may want to pass a marketing campaign ID in the URL and pass it to a Custom field in your CRM. To do this, you would follow these steps:
- Create a hidden Custom field for the marketing campaign ID and add it to your Booking form.
- In the CRM integration setup, map the hidden OnceHub field to the Custom field in your CRM.
- In the marketing campaign add the link to your Booking page with the marketing campaign ID in the URL. For example, go.oncehub.com/example?marketing-campaign-ID=1234
When a booking is made using this link, the marketing campaign ID (1234) will be mapped to the Customer record in your CRM.
Note If you are using UTM codes, you can enable source tracking to pass UTM tags that you have added to your personalized links. The following five source tracking field names are reserved for source tracking, and cannot be used as Custom field names:
- utm_source = used for identifying the traffic source
- utm_medium = used for identifying the delivery method
- utm_campaign = used for keeping track of different campaigns
- utm_term = used for identifying keywords
- utm_content = used for split testing or separating two ads that go to the same URL